
Bcoolsite CMS
Saveti i tutorijali vezani za BCoolsite CMS sistem.
-
Kako da ažuriram tekst na sajtu?
Html box je editor za dodavanje i obradu teksta. U njemu se nalaze mnoge alatke sa kojima ste se susretali u Microsoft Wordu.
Pristupanje text editoru:
U admin panelu pristupite stranici Vašeg web sajta koji želite da menjate. Napomena: obavezno izabrati tačku menija koju želite da editujete.
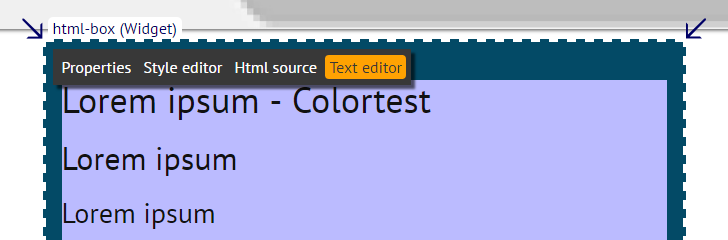
Izaberite opciju Content (dugme narandžaste boje u zaglavlju sajta). Prevlačenjem miša primetićete da se uokvire odredjeni delovi stranice koji sadrže neke opcije medju njima i text editor. Slika ispod.

Kliknite na opciju Text editor (slika ispod)
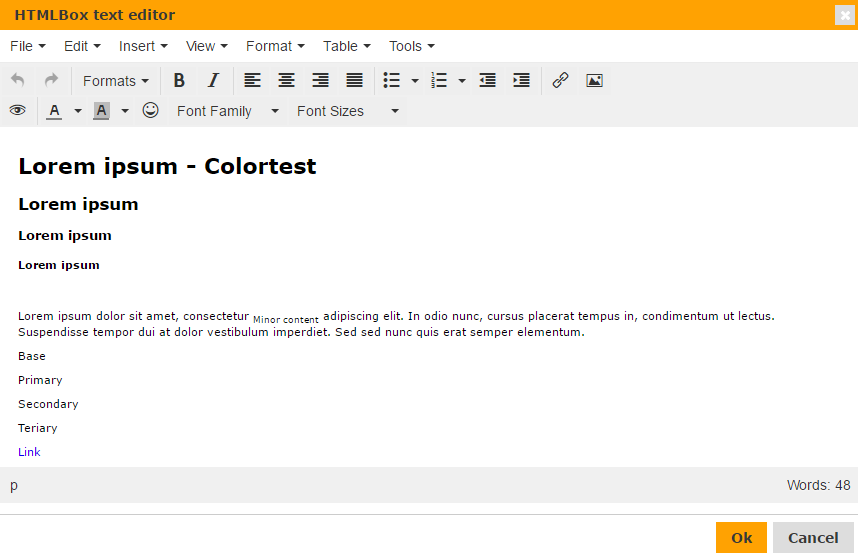
Klikom na opciju Text editor otvoriće Vam se prozor koji možete da vidite na slici ispod.
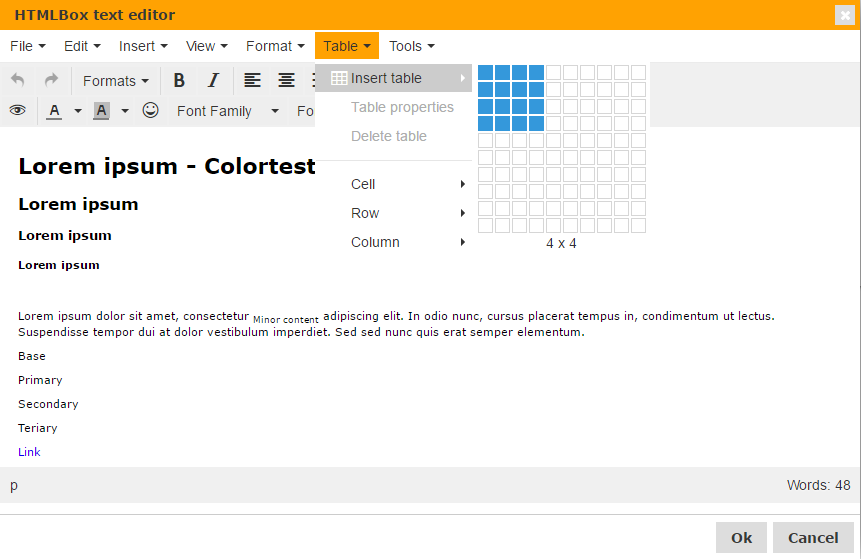
Ubacivanje tabele u Text editoru
Odaberite opciju Table iz padajućeg menija, zatim opciju Insert table u kojoj birate koliko želite da imate kolona i redova. (slika ispod)
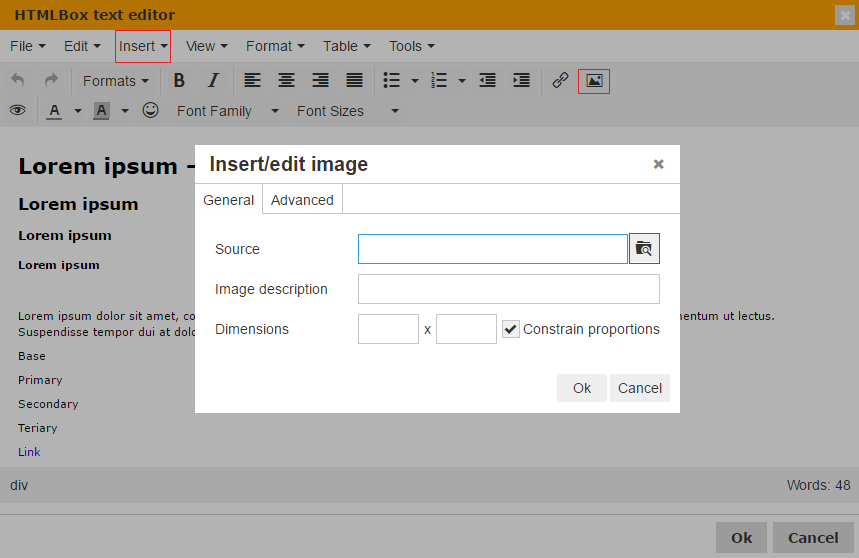
Ubacivanje slika u HTML box text editoru
Iz padajućeg menija izaberite opciju Insert a zatim Insert/edit image ili kliknite na ikonicu (slika dole). Otvoriće Vam se novi prozor. Klikom na lupu (slika ispod), birate sliku koju želite da koristite i koju ste snimili na virtualni disk. (pročitati uputstvo Kako da uploadujem sliku na sajt). Unos slike potrvdite klikom na opciju Ok. Veličinu slike možete podešavati popunjavanjem polja Dimensions.
Ubacivanje linkova u Text editoru
Selektujte tekst koji želite da postane link. Potom izaberite opciju Insert/Edit Link kao na slici ispod. U prozoru koji vam se otvorio, u polju Link URL upišite web adresu koju želite da linkujete. Ukoliko želite da selektovan tekst bude link ka nekoj email adresi u polje Link URL upišite mailto:peraperic@primer.rs (slika ispod)

-
Kako da dodam novu sliku u album?
Nakon snimanja slika, u administracionom panelu odaberite opciju Content i potom AlbumCtrl. (slika ispod)

Otvoriće Vam se novi prozor (slika ispod)
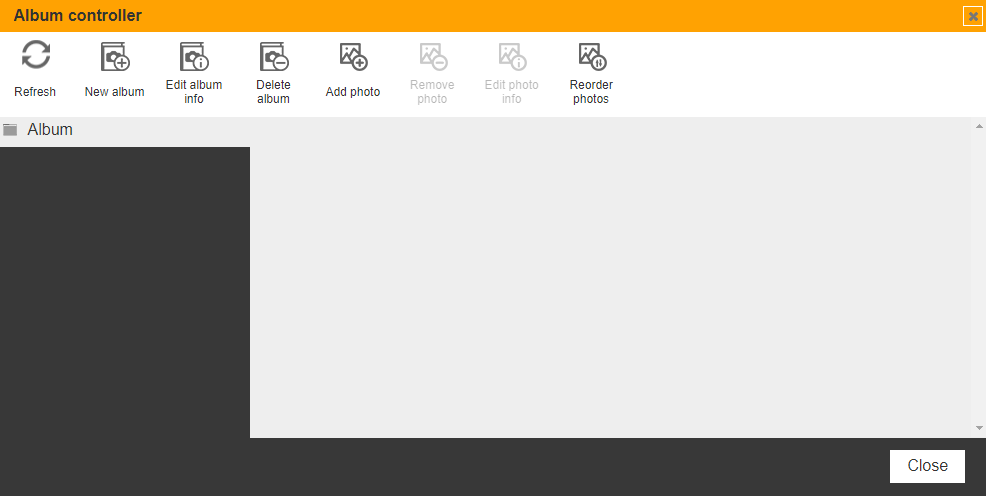
Refresh: Osvežavanje vašeg AlbumCtrl sa novim podacima
New album: kreiranje novog albuma i njegov opis. Nakon pravljenja albuma, dovoljno je da ga selektujete (levim klikom na kišu) i prevučete slike sa vaše radne površine (desktop-a) u njega. Slike će automatski biti prekopirane u album. Nakon kopiranja odaberite opciju "Refresh".
Delete album:brisanje albuma
Add photos: klikom na add photos otvara vam se prozor virtuelnog diska, selektujte folder ili slike koje zelite da vam se pojave u albumu koji ste prethodno napravili.
Remove photos: brisanje slika iz albuma
Edit photo info: selektovanjem slike i biranjem opcije edit photo info, otvara vam se prozor u kojem mozete da promenite ime slike i njen opis
Reorder photos: biranjem ove opcije, dobijate mogucnost da prevlacenjem slika menjate njihova mesta u albumu.
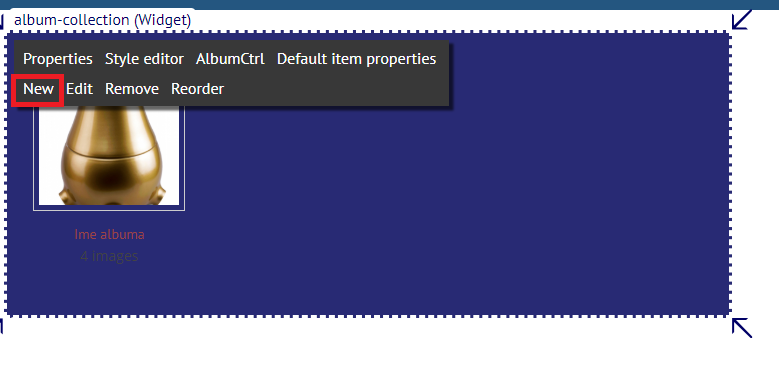
Više albuma na jednoj stranici
Ukoliko na vašem web sajtu imate više albuma na jednoj stranici, nakon pravljenja albuma u "Album controller-u" (pogledati sliku iznad), u administracionom panelu odaberite opciju Content i potom opciju "New". Slika ispod.
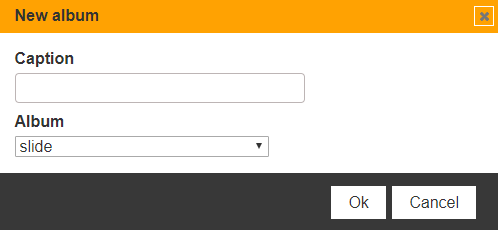
Otvoriće vam se novi prozor. U polje "Caption" upišite naslov koji želite i iz padajućeg menija odaberite album koji ste pretphodno napravili u "Album Controller-u". Slika ispod:
-
Kako da dodam YouTube video u sklopu teksta?
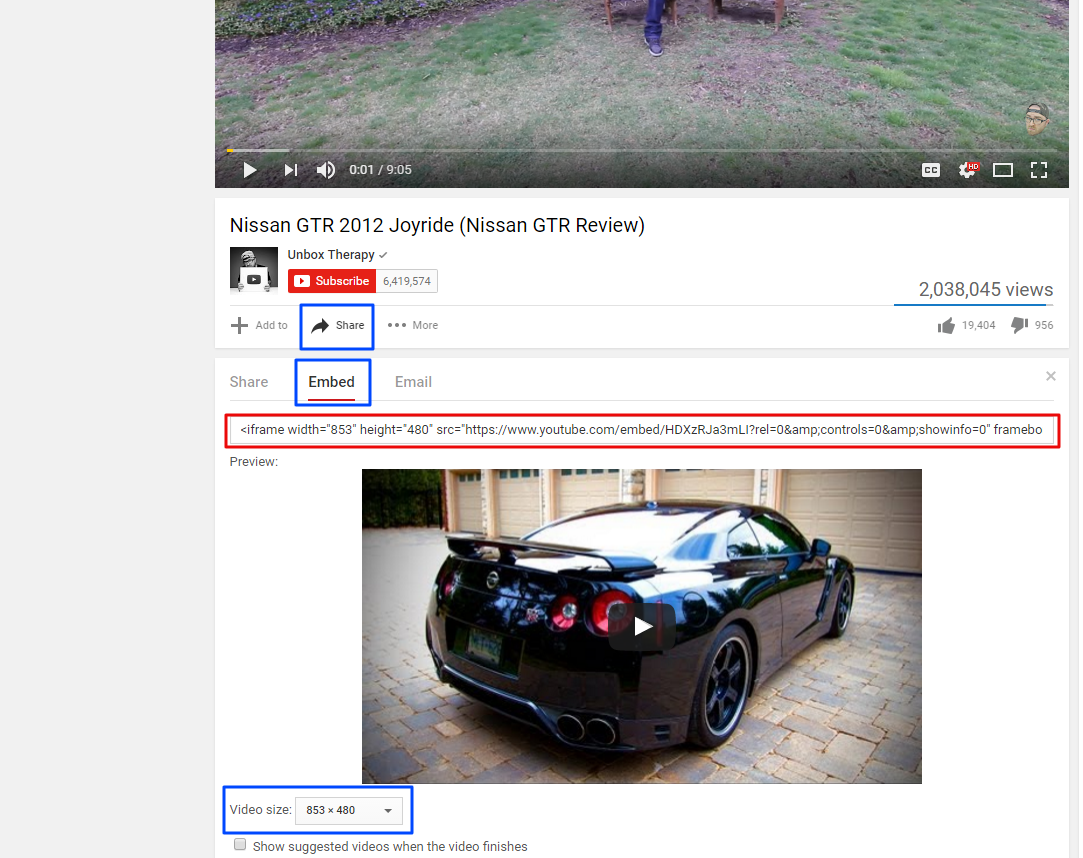
Nakon odabira videa koji želita da postavite na YouTube-u potrebno je da izaberete opciju "Share", nakon toga "Embed" (obeleženo plavom bojom). Takođe možete da izaberete i veličinu videa koju želite da postavite na Vaš sajt. (obeleženo plavom bojom).
Kopirajte tekst (Ctrl + C na tastaturi), koji Vam je uokviren crvenom bojom (<iframe width=..............)
Slika ispod:
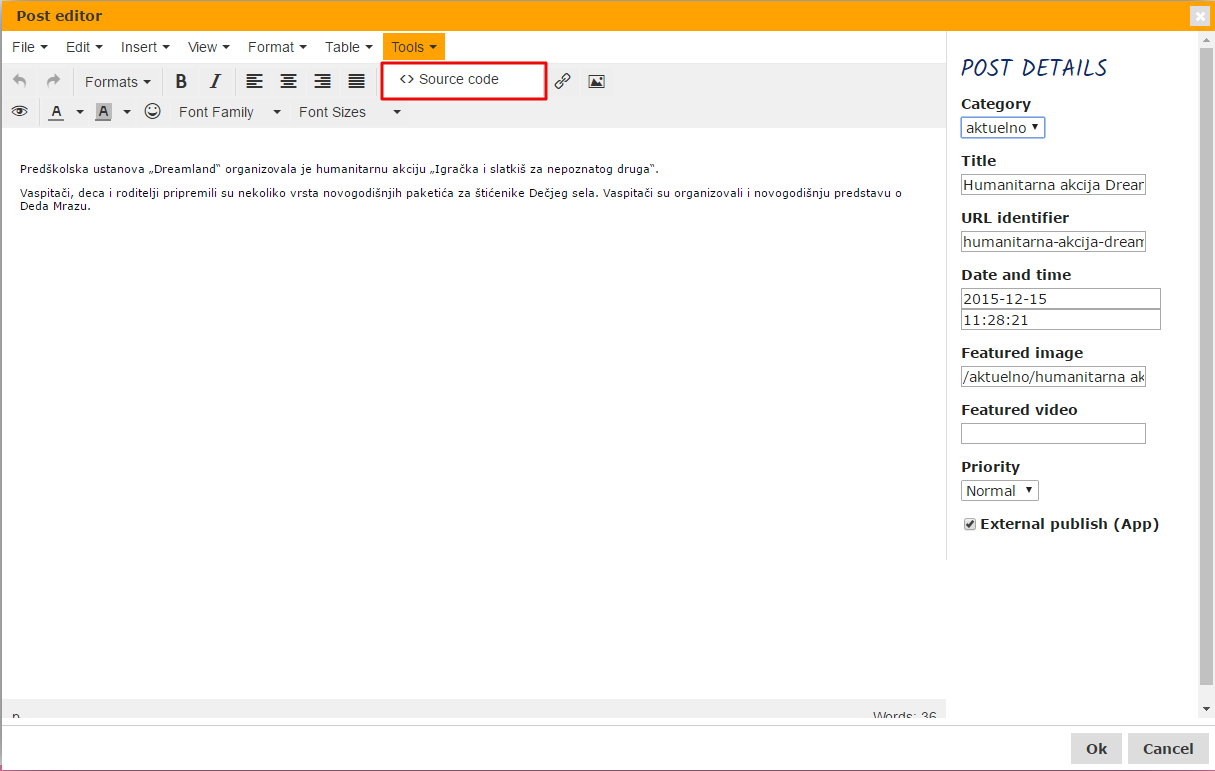
Sledeći korak je da odete na Vaš sajt i u sklopu vesti ili teksta koji pišete klikom na opciju "Tools" odaberite opciju "<> Source code".
Slika ispod:
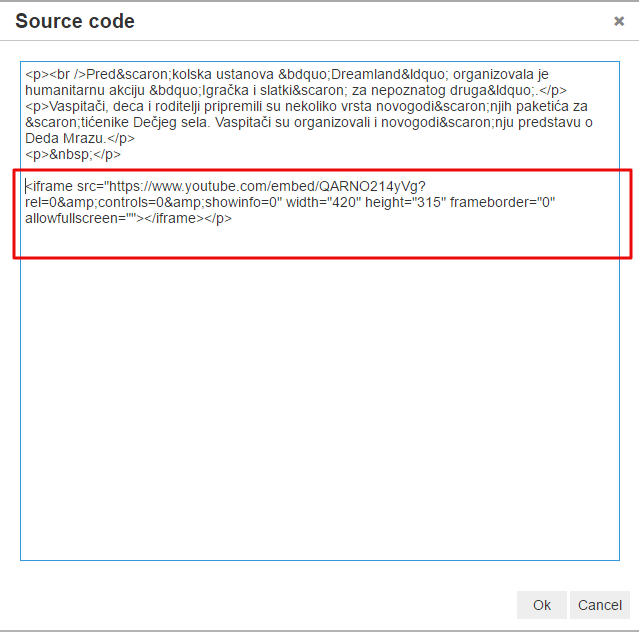
Otvoriće Vam se novi prozor (Source code), u tom prozoru uradite Ctrl + V kako bi ste kopirali tekst sa YouTube-a. Potvrdite klikom na dugme "Ok"
Slika ispod:
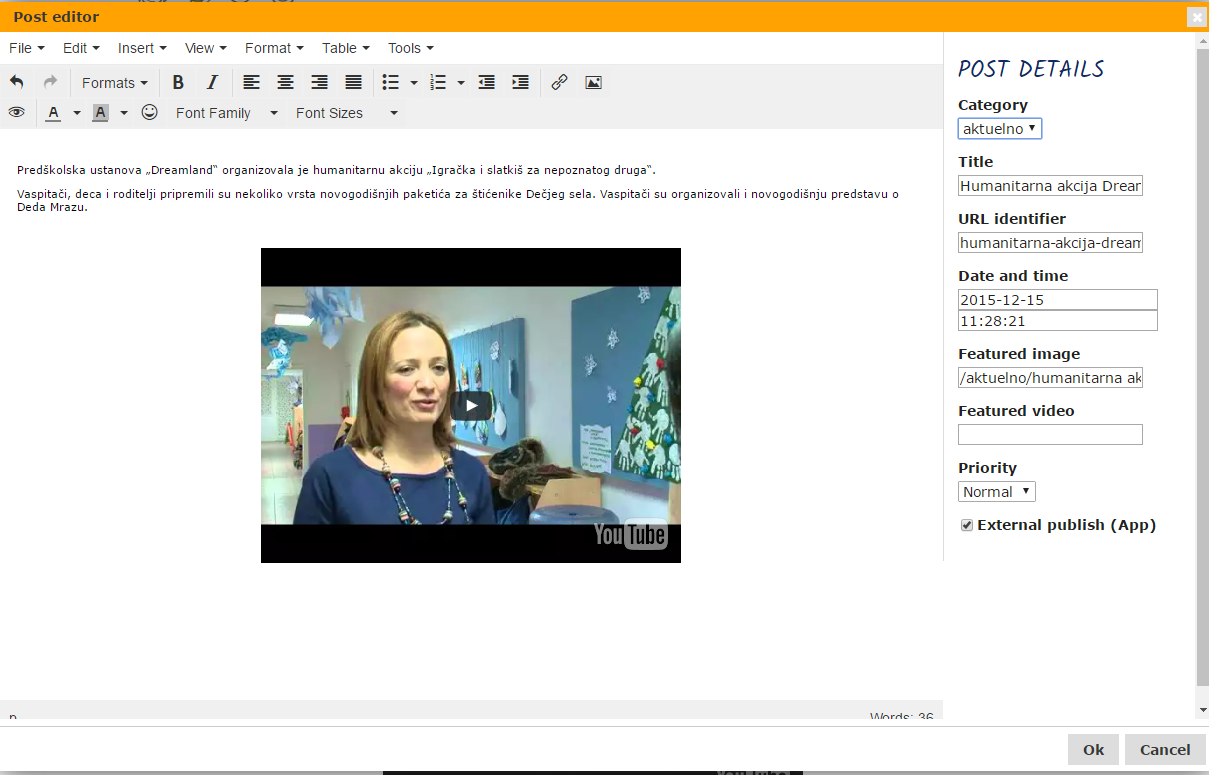
Pojaviće Vam se video u sklopu teksta.
Slika ispod:
-
Kako da napišem novu vest na blogu?
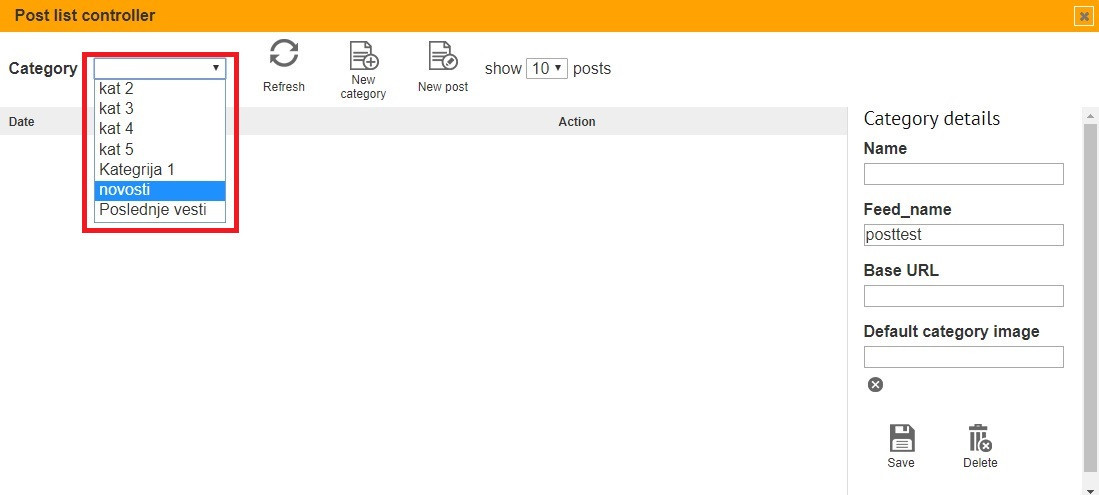
U administaracionom panelu izaberite opciju Content, nakon toga izaberite opciju Post List Controller (slika ispod).

Otvoriće Vam se novi prozor. U padajućem meniju izaberite kategoriju u kojoj želite da pišete nove ili editujete postojeće postove. (slika dole)
 Napomena: za editovanje postojeće vesti ili članka kliknite na ikonu
  a za brisanje na
  .
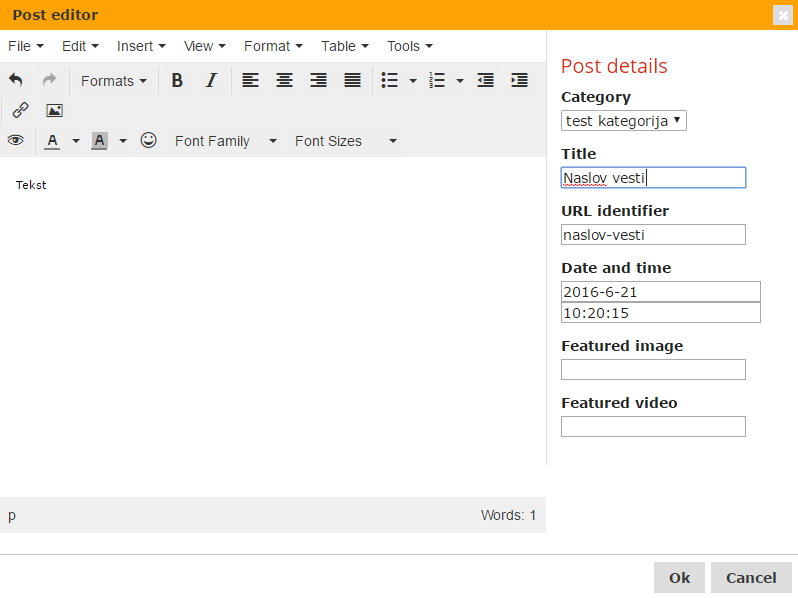
.Nakon odabira kategorije u kojoj želite da pišete kliknite na dugme New post i otvoriće Vam se Post editor preko kojeg vršite upis novog teksta ili članka.
- U polje Title upišite naslov vašeg novog članka ili vesti.
- URL identifier se popunjava automatski
- U polju Date and time možete da izaberete datum i vreme kada je članak ili vest napisana.
- Klikom na polje Featured image, otvoriće Vam se virtuelni disk i u njemu birate naslovnu sliku za Vašu vest ili članak. (pročitati uputstvo kako da uploadujem sliku na web sajt?)
Slika ispod.
Napomena: preko Post editora možete da dodajete tabele, slike, linkove..., u sklopu svoje nove vesti ili članka. Dodavanje spomenutih elemenata se vrši isto kao HTML text editora. (pročitati uputstvo Kako da ažuriram tekst na sajtu?)
-
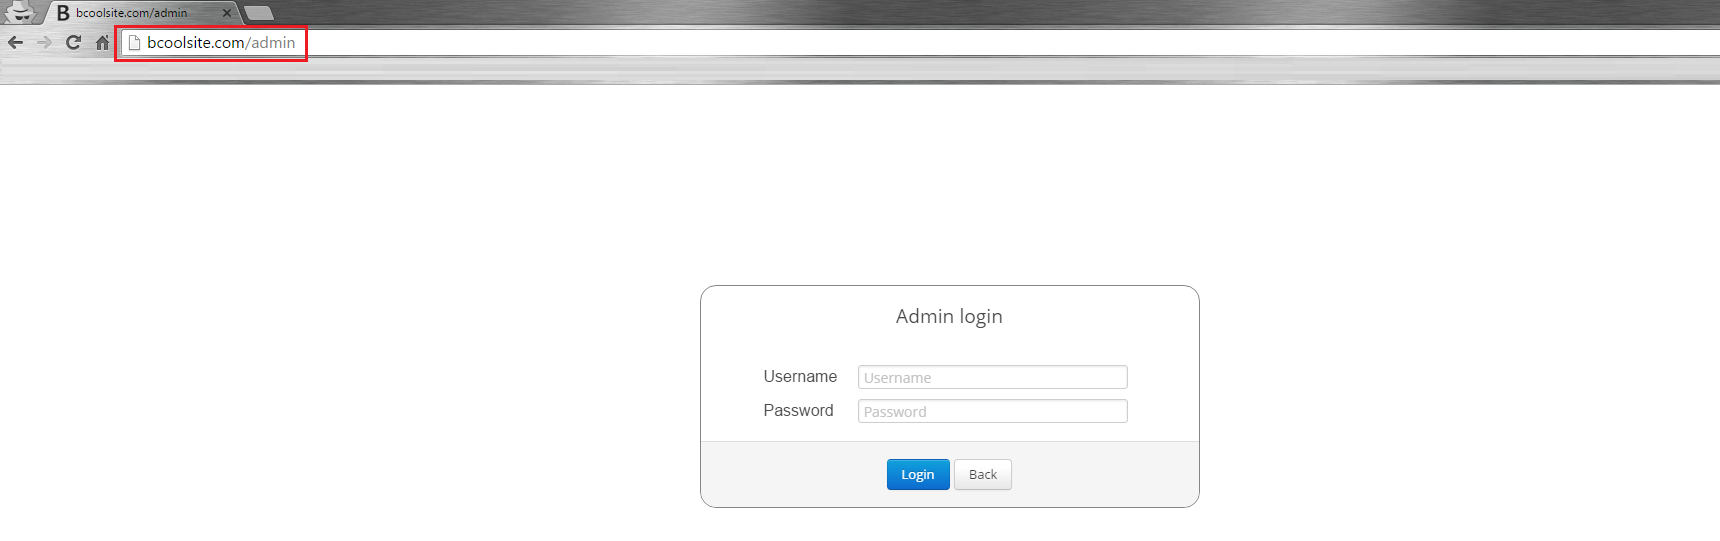
Kako da pristupim administracionom panelu?
Pristupanje administracionom panelu za ažuriranje sadržaja pristupate tako što u nastavku imena svog domena dodate /admin
Popunjavanjem polja Username i Password pristupate panelu. (slika ispod)
-
Kako da uploadujem sliku na web sajt?
Da bi ste pristupili Vašem virtuelnom disku, preko administracionog panela izaberite opciju Files. Slika ispod.

Na ovom virtuelnom disku čuvate vaša dokumenta i slike koje su Vam potrebne za sklapanje Vašeg sajta.
Slike i fajlove možete snimiti na vaš disk tako šte ćete sa vašeg kompjutera jednostavno uraditi "drag and drop" u željeni folder.
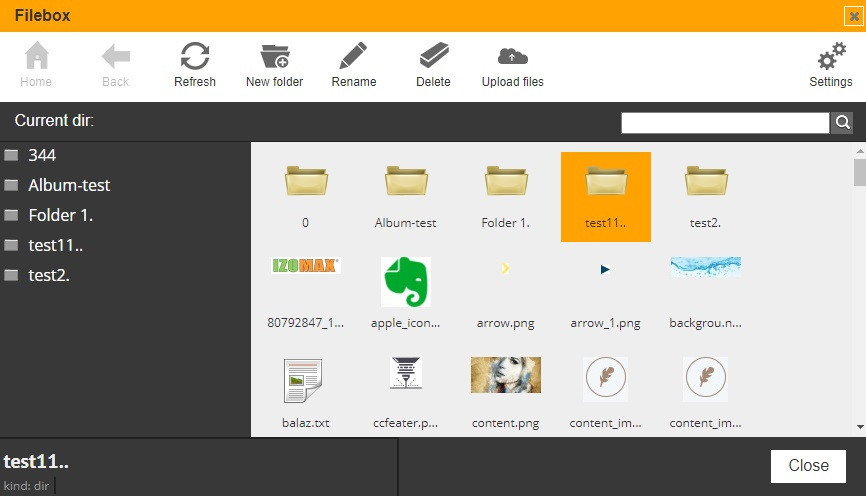
Home: Vraćanje u osnovni direktorijum vašeg virtualnog diska.
Up: Vraćanje u prethodni direktorijum
Refresh: Ažuriranje tj. osvežavanje vašeg virtualnog diska sa novim podacima.
Make Directory: Kreiranje novog direktorijuma.
Rename: Menjanje imena direktorijuma ili fajla.
Delete: Brisanje direktorijuma ili fajla.
Upload Files: Učitavanje fajlova iz vašeg kompjutera koje želite da postavite na vaš virtualni disk.
Napomena: Savetujemo Vam da napravite foldere sortirane po tačkama menija ili kategorijama i time sebi olakšate preglednost, kako bi ste u svakom momentu znali gde Vam se šta nalazi.
-
Zaboravio sam svoju šifru za pristupanje adminu? Šta treba da radim?
Ukoliko ste zaboravili svoju pristupnu šifru, moguća je zamena putam email zahteva.